Just after it went online, there were constant malicious scans to reinforce it.
As soon as the website was published, it was being scanned all the time.
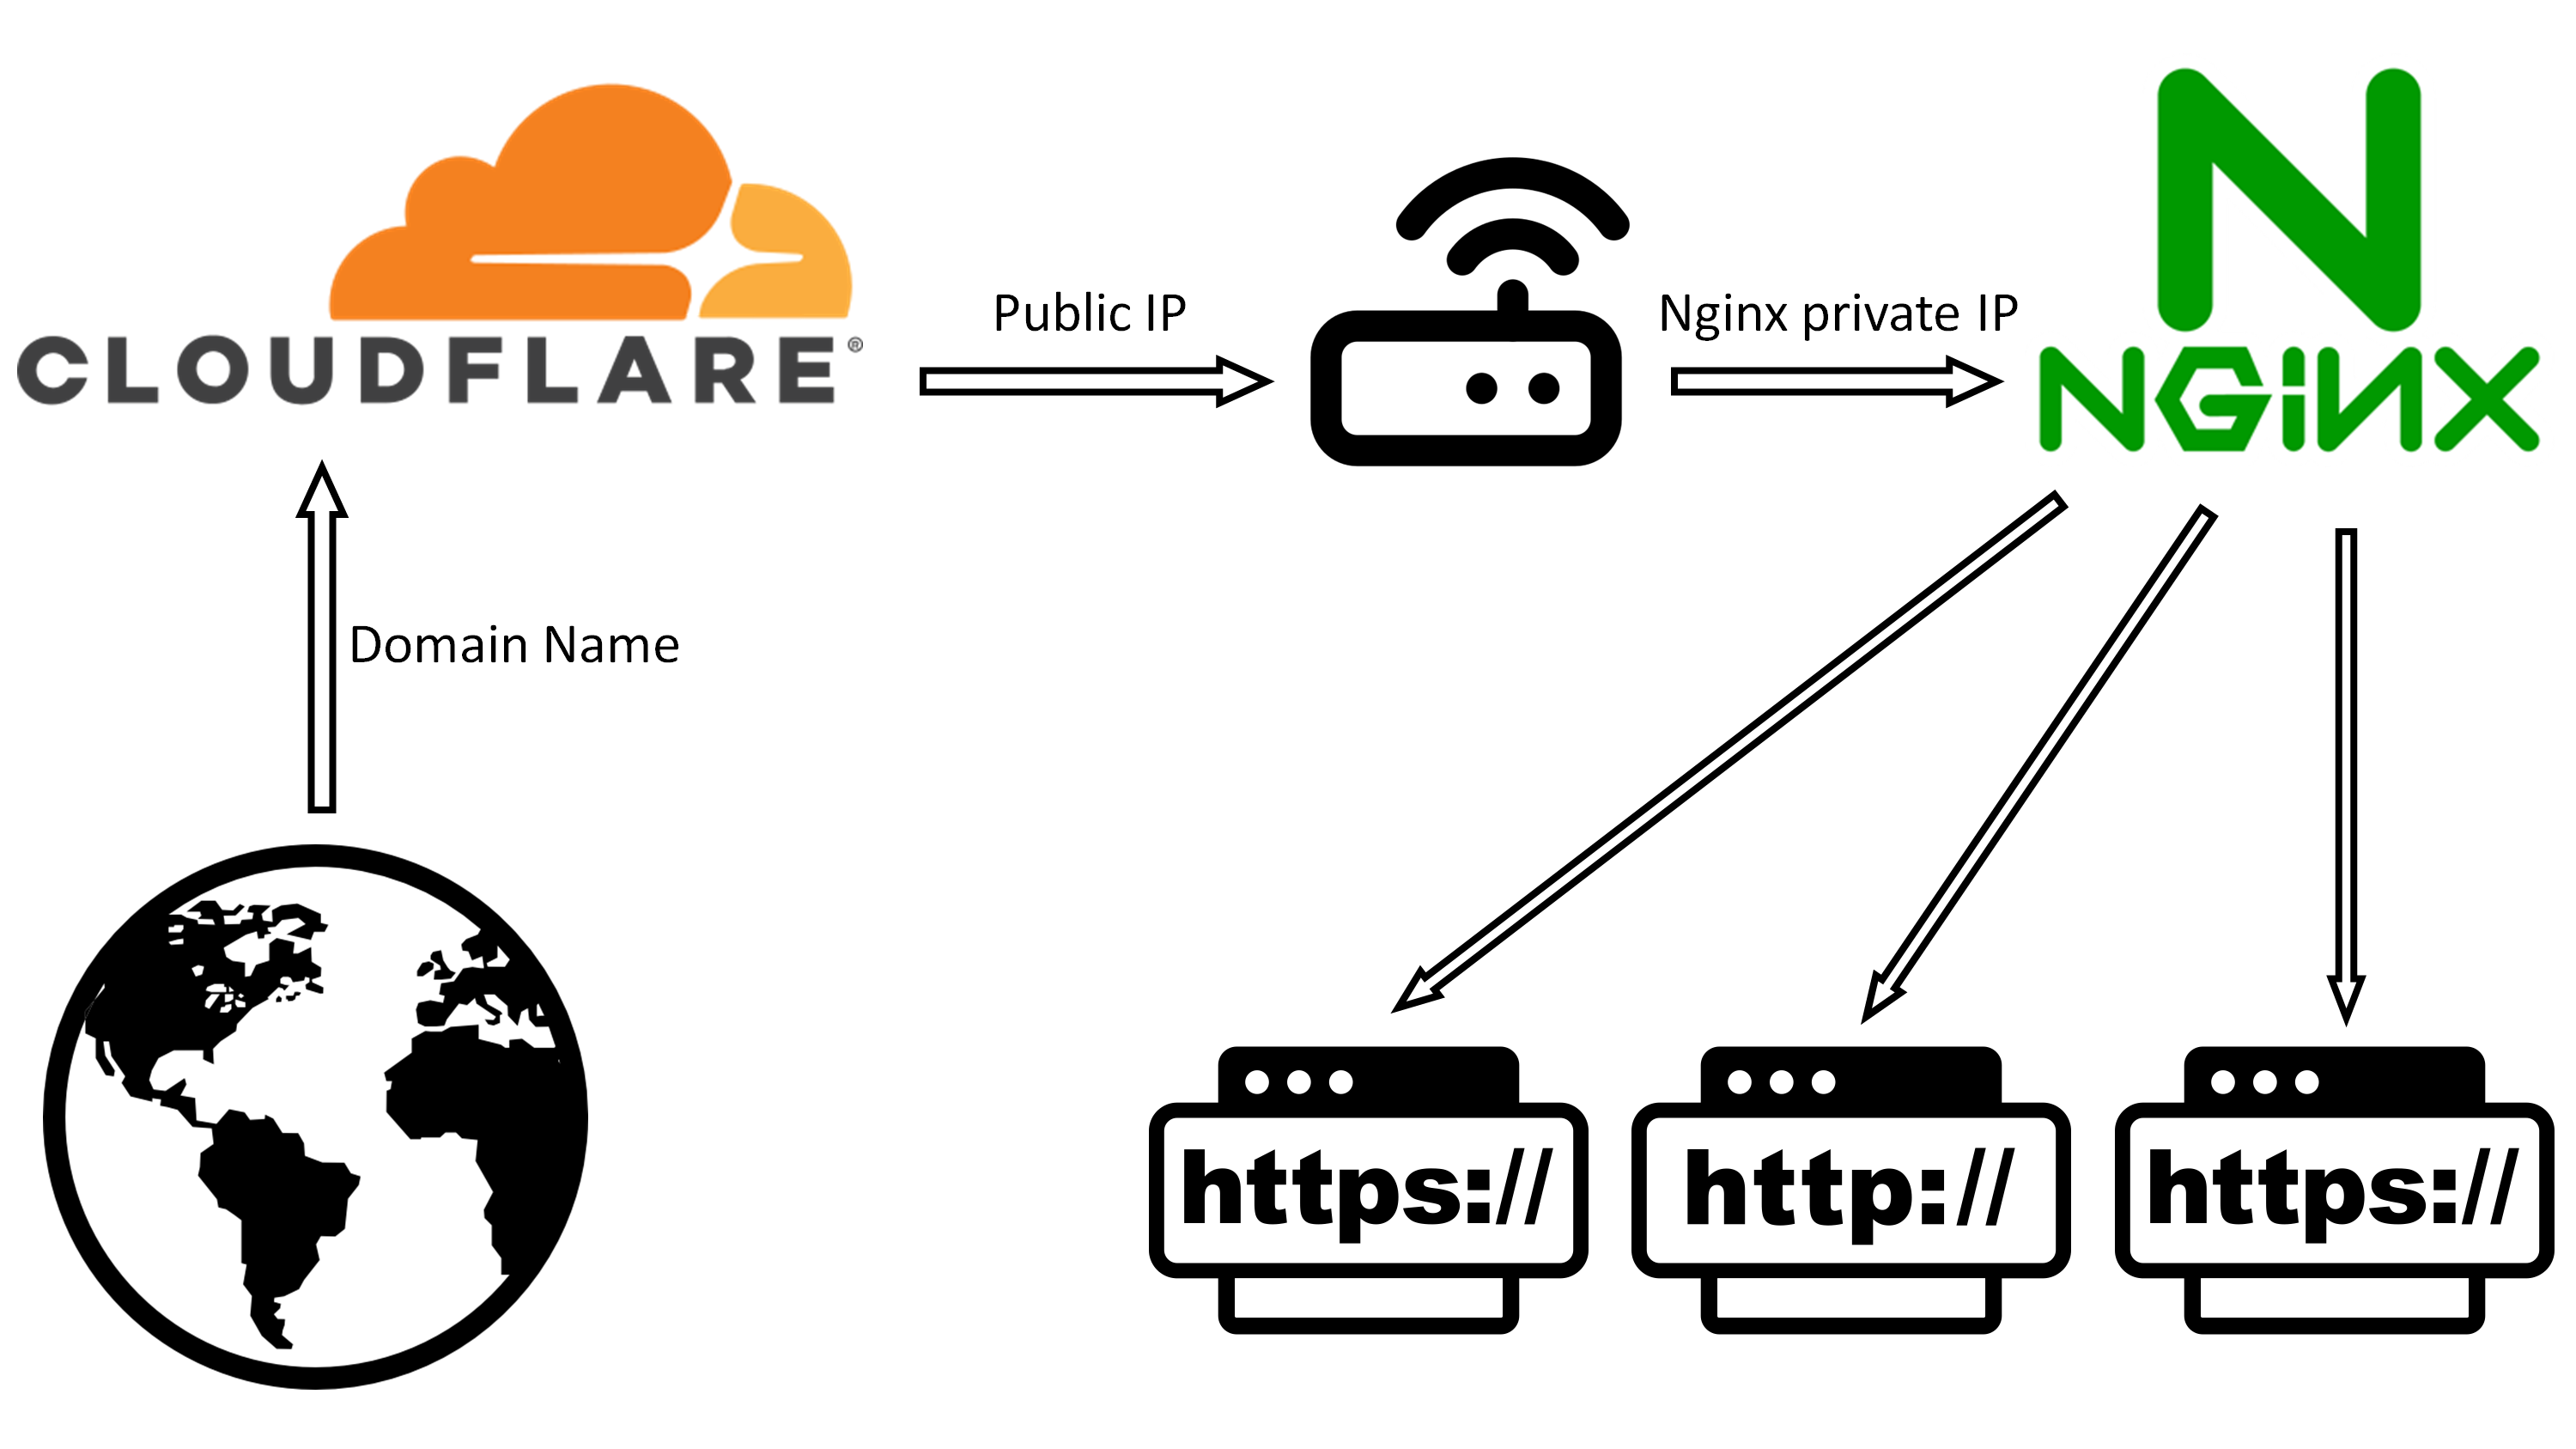
It turns out that this IP has been scanned all the time, and a Thunderpool WAF was installed, but my small computer is a bit immobile, and nginx was broken yesterday, so I simply restored the snapshot, no longer using the Thunderpool WAF, and installed Nginx strict configuration and fail2ban, and see what the effect is?
Learn by doing
Disabling direct access via IP in Nginx essentially sets a “default interceptor”. When the Host field in the request header does not match the domain name you bound, Nginx will assign it to this interceptor and deny service. The steps are as follows:
1. Find the main configuration file
Usually in /etc/nginx/nginx.conf or /etc/nginx/sites-available/default.
2. Add the “default server” configuration block
At the very front inside the http { … } block, add the following. The purpose of this configuration is to capture all requests that are not defined in other server_names (including direct access to IP):
# Intercept HTTP (port 80) IP direct accessserver {    listen 80 default_server;    listen [::]:80 default_server; # Support IPv6    server_name _; # Underscore indicates matching all unmatched domain names/IPs
    # Cut off the connection directly without giving any response, which saves resources the most    return 444;}
# Block HTTPS (port 443) IP direct access (if there is a certificate)server {    listen 443 ssl default_server;    listen [::]:443 ssl default_server;    server_name _;   # A pair of valid certificate paths must be specified, otherwise Nginx cannot start    # You can directly reuse the certificate of your existing domain name    ssl_certificate /etc/nginx/ssl/your_cert.pem;    ssl_certificate_key /etc/nginx/ssl/your_cert.key;
    return 444;}
3. Detailed explanation of parameters
default_server: key parameter. Tells Nginx that if the requested Host does not match any other server block, this block will handle it. server_name _: The underscore here is an invalid domain name placeholder, specifically used to capture IP access or malicious domain names that point randomly to your server. return 444: This is Nginx’s special non-standard status code. It closes the connection immediately without sending back any HTTP response headers. This is more secure than returning a 403 or 404 because an attacker has absolutely no access to any information about your server.
4. Make sure your real website has server_name
Make sure that the server block where you store your web pages is configured with the correct domain name:
server { listen 80; server_name www.yourdomain.com; # Only access through this domain name will be processed here root /var/www/html; ...}5. Verify and restart
Check syntax:
sudo nginx -tOverload configuration:
sudo nginx -s reload6. Test effect
Enter in your local computer browser or terminal:
curl -I http://your server IPExpected results: The terminal displays curl: (52) Empty reply from server or the browser prompts “Connection reset”, which indicates that the interception is successful. Why is this necessary in 2026? Current automated scanners (such as zgrab in your log) will scan the entire network for ports 80/443 in the IP range. If you do not set a default blocking, Nginx may assign IP access to the first website in your list by default, exposing your website structure and backend vulnerabilities. Setting 444 is currently the most efficient protection method.
solve things
I gave GOOGLE AI a log, Answer:
This is a very typical automated scan of the entire network. You need to understand a cruel fact: In 2026, as long as any public IP goes online and opens port 80/443, it will be discovered by global scanners (Botnet) within an average of 60 seconds and begin to attempt attacks. Detailed answers to your questions are as follows:
1. How did he know that I had just configured the website?
He doesn’t necessarily know that you “just configured it”, but he has been blindly scanning: -IP segment polling: Hackers rent a large number of VPS (for example, 52.147.68.81 in your log belongs to the Microsoft Azure data center) and continuously scan global IPv4 addresses in a loop. -Certificate Transparency (CT) log: If you apply for an SSL certificate (such as Let’s Encrypt) for your domain name, the certificate information will immediately enter the public CT log. When the scanner monitors the issuance of a new domain name certificate, it will immediately initiate a targeted scan. -Fingerprint detection: If the scanner finds that your 80/443 is responding, it will immediately trigger the “WordPress Vulnerability Dictionary” and try to access paths such as /wp-admin to see if you are using WordPress.
2. Dangers of this kind of scanning
-Resource consumption: Although your server returns 404, each request consumes Nginx connections and bandwidth. -Looking for backdoors: wso.php in the log is the famous PHP webshell. He is searching to see if you have any Trojans left behind by predecessors, or if you have installed a vulnerable plug-in. -Forged sources: Note that the Referer in the log is yahoo.com, google.de, which is forged to mislead log analysis or bypass simple security filtering.
3. What should you do? (Practical suggestions)
If you don’t use WordPress to build your website, these scans are just “noise” to you, but banning is still recommended. -Solution A: Use Nginx to quickly block WordPress detection Add the following regular rules to the server block of your subsite configuration file to directly deny access to these sensitive directories:
location ~*^/(wp-admin|wp-content|wp-includes|wp-config|phpmyadmin) { deny all; access_log off; # Do not record these annoying 403 logs to reduce IO log_not_found off;}-Option B: Deploy Fail2Ban (strongly recommended) Fail2Ban is the answer to this frenzied attempt to try dozens of paths in 1 second.
- Installation: sudo apt install fail2ban
- Configuration: Enable nginx-botsearch.
- Effect: When 52.147.68.81 continuously requests 5 non-existent paths (404), Fail2Ban will directly prohibit access to this IP at the operating system firewall level, and your Nginx will not even receive its request again.
-Option C: Use cloud platform “security group” Overseas traffic interception: If your business is only for domestic use, directly block overseas IPs in the security group/firewall of the cloud service provider (Tencent Cloud/Alibaba Cloud/Huawei Cloud). Most of the Microsoft Azure IPs in your logs come from overseas data centers. After blocking, the server will be instantly clean by more than 95%. Summary This doesn’t mean your server is unsecured, it’s just background noise from the internet. As long as you do: Disable direct IP access (default_server configuration taught earlier). Non-WordPress directory blocking. Fail2Ban automatically bans persistent scanners. Your server will be as stable as a rock in the complex network environment of 2026.
Fail2Ban
Deploying Fail2Ban Let me explain in detail how I do it.
In Linux operation and maintenance practice in 2026, deploying Fail2Ban is the most standard means to combat automated scanning (such as the WordPress vulnerability detection you saw before). It reads Nginx logs, discovers malicious behavior, and directly calls the firewall to block the other party’s IP. The following are detailed deployment steps for Ubuntu/Debian systems:
- Install Fail2Ban
sudo apt updatesudo apt install fail2ban -y- Create a local configuration file
The default configuration file for Fail2Ban is /etc/fail2ban/jail.conf, but do not modify it directly. We should create a .local file which has higher priority and will not be overwritten during software updates.
sudo cp /etc/fail2ban/jail.conf /etc/fail2ban/jail.local- Configure protection rules for Nginx
Edit the file: sudo nano /etc/fail2ban/jail.local. Find or add the [nginx-botsearch] and [nginx-http-auth] sections and modify them as suggested below:
[DEFAULT]#Block duration (1 day)bantime = 1d# Statistics duration (ban if the number is reached within 10 minutes)findtime=10m#Maximum number of attemptsmaxretry=5
[nginx-http-auth]enabled = trueport=http,httpslogpath = /var/log/nginx/error.log
[nginx-botsearch]# Specifically deal with the behavior of scanning wp-admin that does not exist in your logsenabled = trueport=http,httpsfilter = nginx-botsearchlogpath = /var/log/nginx/access.logmaxretry = 3- Custom hardening for WordPress scanning (optional) If you want to specifically target the intensive scanning of paths such as /wp-content/in your log just now, you can customize a filter. Create filter file: sudo nano /etc/fail2ban/filter.d/nginx-forbidden-paths.conf Write regular rules:
[Definition]failregex = ^<HOST> -.*GET .*(wp-admin|wp-content|wp-includes|wp-config|phpmyadmin|etc/passwd|bin/sh)ignoreregex=Enable it in jail.local:
[nginx-forbidden-paths]enabled = trueport=http,httpsfilter = nginx-forbidden-pathslogpath = /var/log/nginx/access.logmaxretry=2- Start and verify
# Start and set up auto-start at bootsudo systemctl enable fail2bansudo systemctl restart fail2ban
# Check Fail2Ban running statussudo fail2ban-client status
# View the specific Nginx banned jail (you can see the list of banned IPs)sudo fail2ban-client status nginx-botsearch- Common maintenance commands (very practical)
Manually unblock an IP: sudo fail2ban-client set nginx-botsearch unbanip 52.147.68.81 Manually ban an IP: sudo fail2ban-client set nginx-botsearch banip [IP address] View Fail2Ban logs in real time: sudo tail -f /var/log/fail2ban.log (When an IP is blocked, [nginx-botsearch] Ban 52.147.68.81 will be displayed here)
- Special recommendations for 2026 Cooperate with backend reinforcement: Fail2Ban is a “post-processing”. Combined with the return 444; (disable IP access) you did before, the attacker will not even have the chance to generate a large number of 404 logs, which can greatly reduce the pressure on the server.
Whitelist: Remember to set ignoreip = 127.0.0.1/8::1 [your office/home fixed IP] under [DEFAULT] in jail.local to prevent yourself from being banned for entering the wrong password or refreshing it frequently.
Published at: Jan 2, 2026